One of the most popular ways that hanfu culture has been popularized both in China and elsewhere has been through social media and TikTok videos. Most of you have probably watched similar kinds of videos involving ‘transitions’—essentially, transitioning from modern-day or loungewear-like attire to being dressed up in gufeng-style hanfu.
There are a lot of variations on different types of these videos and trends that have been used to structure them, but one of the easiest ones to do that can easily be filmed at home is a camera swipe transition, which involves swiping something across the camera and using that to splice two recordings together.
If you want to try filming a video yourself, feel free to follow this guide and give it a shot! I’ll be using Meitu for this, one of many powerful (and free!) apps that can help with photo and video editing, but there are a lot of different apps out there that you can use including Snow, iMovie, etc., all of which are free. Otherwise, a tripod, a phone with a camera, and a location with decent lighting are really all you need!
1. Planning
A few things to think about before you actually start—what background music do you want to use? Where are you going to film? What do you want to do in each clip?
Background music is often key to the flow of your video! You can watch other clips on TikTok and compilations on youtube for inspiration if you’d like. A lot of them time things exactly right so that the transition happens at the same time as a beat drop or a climax of the song, which can look really cool. Some popular songs include:
But anything will do!
Once you have your song and location, you should probably decide what you’re going to be doing during the video, since just standing there can feel sort of awkward. Remember, you’re going to be basically recording two clips, one before and one after (each will be about 10 seconds long but you don’t really have to worry about how long they are, you can take care of that during editing), and then combining them together into one long video.
Props can help a lot with deciding what to do during the video/posing during the video and also transitioning between clips. I used a rattle drum in mine, or a 波浪鼓, but other popular props include fans, hair sticks, other accessories, umbrellas, really whatever you want. Try showing off the prop to the camera, or putting it to the side first, pretending you’ve just discovered it and picking it up (that’s what I did).
If you don’t have a prop, there are plenty of other methods to buy you time, too. For the first clip, you can ‘walk into’ the camera like I did, walking from outside the screen into the middle, which can take a few seconds. For the second clip, once you have your hanfu on, you can do a few motions like playing with your clothing or spinning around to show off the fabric. Fan yourself with a fan if you’re using a prop, or smile at the camera.
If you don’t know exactly what you’re going to do, it’s okay! A lot of motions come naturally to you once you start filming, and you can film as many times as you want till you’re satisfied. Then just plan a time to film—you’ll want to allocate enough time to do both in the same day/same time, since it’ll look more realistic if your camera is in the same place for both clips—and you’re set!
2. Preparing the Music
This can be sort of tricky, but the best way I’ve found to prepare the music is to use a youtube -> mp4 converter online (make sure to find a legit one and be careful of ads and stuff for safety). Use it to change the youtube video of the music into an mp4, then send it to your phone (airdrop works really well) and download it as a video. This will make it a lot easier to use as background music later. Also if you want to reduce the time it takes to transfer the video between devices you can look for existing videos of hanfu transitions that already have the music cut to the desired length and just use that instead, since it’s a shorter clip.
3. Setup
After you’ve decided where you want to film, set your phone and tripod up in front of your background and angle the camera the way that you want. Once again, the way this video is structured will just be two clips—one ‘before,’ one ‘after,’ edited together into one longer clip.
To make sure you have the camera set correctly, try recording a few test clips before you start—start the recording, and then walk in front of it where you expect you’ll be in the actual recording and just kind of wave your arms around a bit, then go back and rewatch the test clip. You’ll know immediately if the camera is angled too far down or up, and can adjust accordingly, then film another test clip. Repeat this process until you’re satisfied with the angle. (The same goes for zooming in/out, and tilting left/right.)
4. Recording the First Clip
Press record and proceed with whatever you’ve planned! This first clip is going to be you in normal/modern clothing, and should be around 10 seconds long. Walk into the camera, pose, smile at the camera, do whatever you want! It’s okay to be a little awkward, everyone is sometimes, and again you can record however many times you want until you’re satisfied. Also don’t worry about scrambling to get in front of the camera right after you start recording, you can cut the clip later.
The important thing is that at the end of the video, swipe something across the camera for the transition. This can be a prop, like a fan or an umbrella, or even just your sleeve or your hand. Try to make sure the entire camera is blacked out so that you can make a smooth transition between the clips.
You can record as many times as you want, I think I did like twenty clips of this until I could find one that I wanted!
5. Recording the Second Clip
Get dressed up, put on makeup (or not, there are no rules to this), do whatever you want to make you feel confident and get ready to record the second clip! Try to make sure that the camera’s in the same place. For this clip, you’ll want to swipe something across the camera at the BEGINNING of the clip instead of the end, since you’ll be transitioning from the end of the first clip to the beginning of the second clip.
After that, do whatever you want to show off your outfit—twirl, play with the fabric, or just smile at the camera again. You can choose whether you want to walk out or just end the clip there.
6. Editing/Combining the Clips
This part seems intimidating, but fear not, it’s really easy! You’ll want to use something like Snow, Meitu, or iMovie (Adobe Suite is fancy and works too if you’re used to it but expensive) to combine the clips with background music. I’ll be using Meitu as an example because it’s what I use, but most other programs should be pretty intuitive too.
Once you have your two clips and music picked out, go into the Meitu app. Press the ‘video editing’ option in the top bar, and it should open up your camera roll.
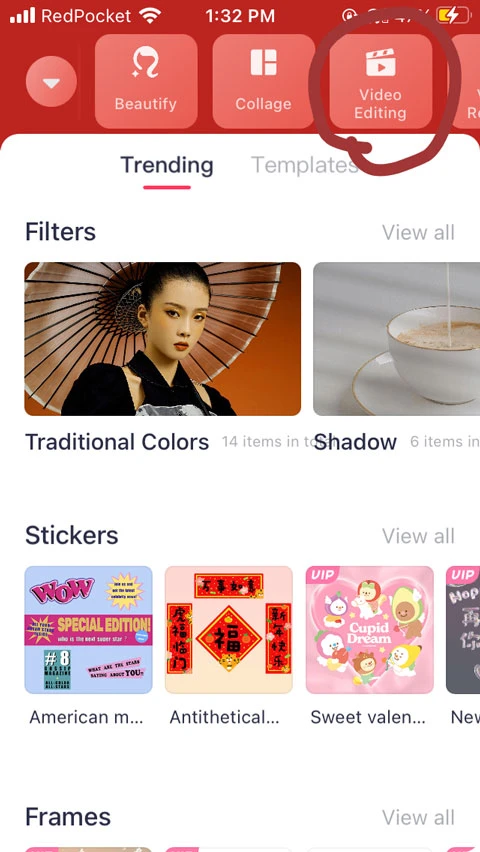
Video editing
Select the clips you want in order (first clip, then second clip), and then press start.
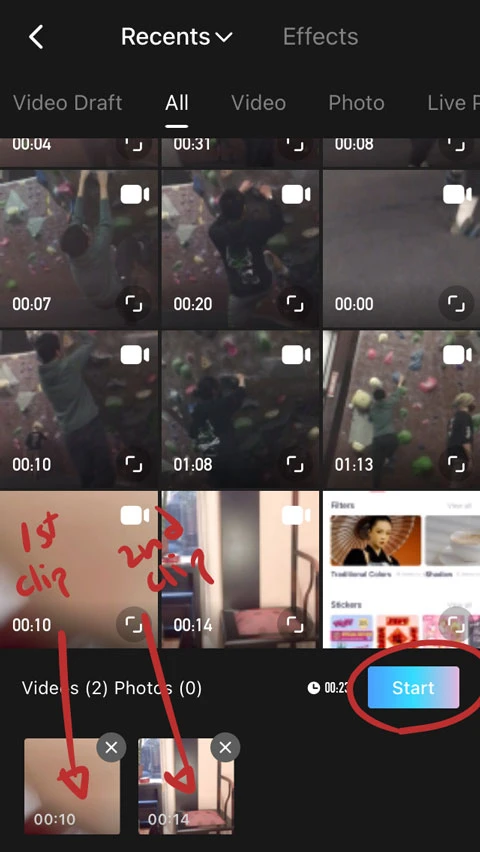
Select the clips
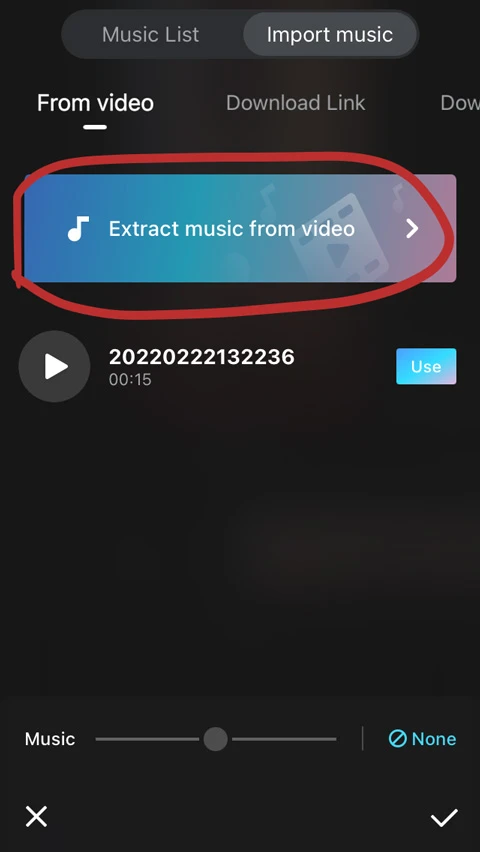
Next, find the ‘music’ tool in the toolbar. You’ll want to switch from ‘music list’ to ‘import music,’ which will let you import the music that you picked out.
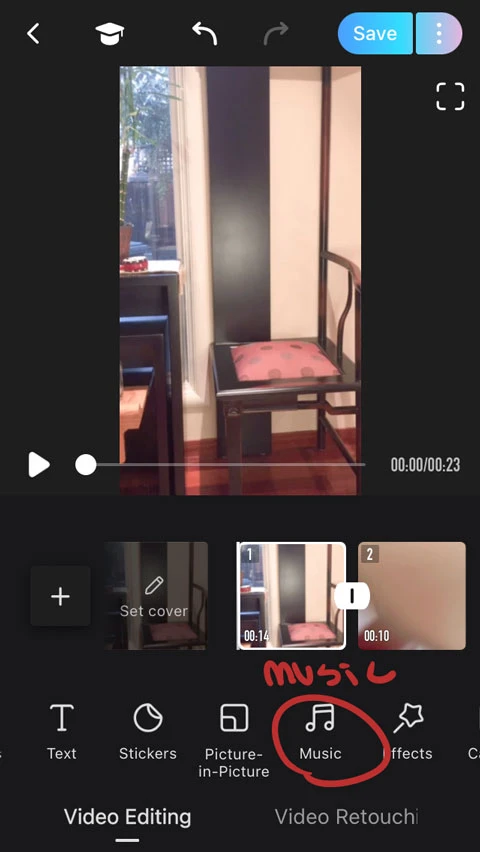
Select the music
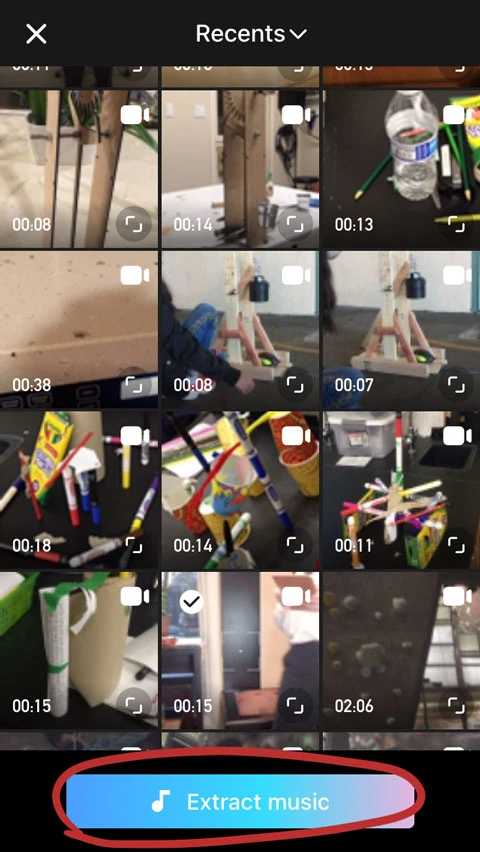
If you downloaded the music into iTunes on your phone, you should be able to go to ‘downloaded music’ and select it from there, and if you dowloaded the music into your camera roll, you can click ‘extract music from video’ and use that instead.
Now that you have all your elements in, trim your clips and music to the desired length. Tap the video bar so that your clip is selected, then drag the two tabs on the left and right to shorten or lengthen the video.
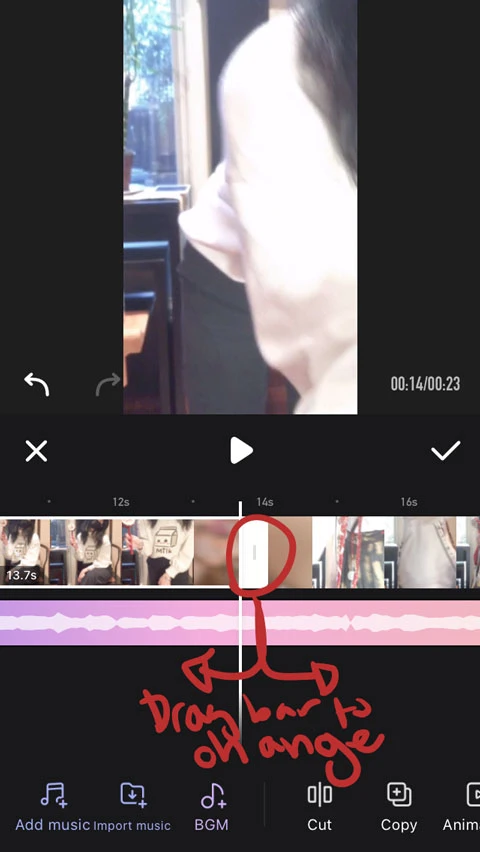
Trim clips and music to the desired length
Do the same with everything else so that it only uses as much of the song or video clip as you want.
Then listen to the music—you want to time it correctly so that the transition happens at the same time as the music’s beat.
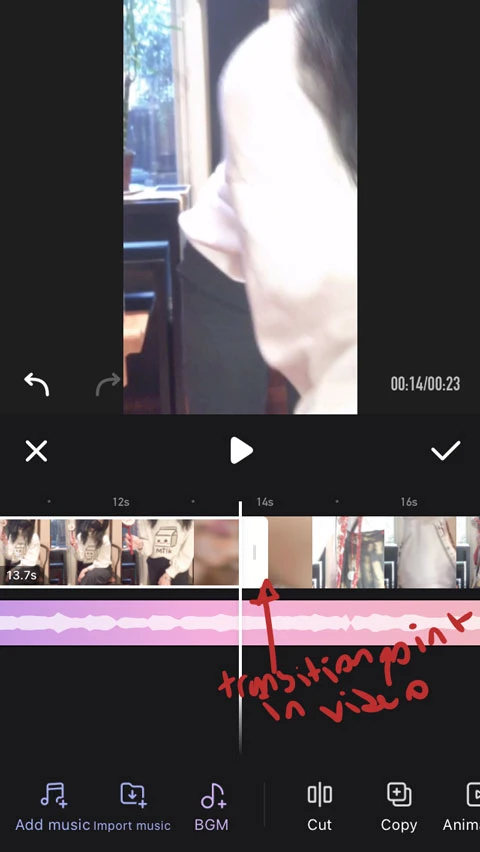
Transition point in video
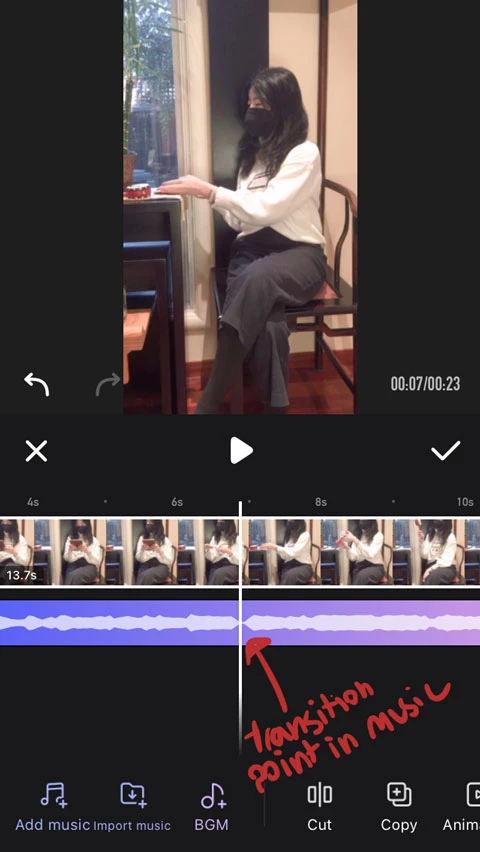
Transition point in music
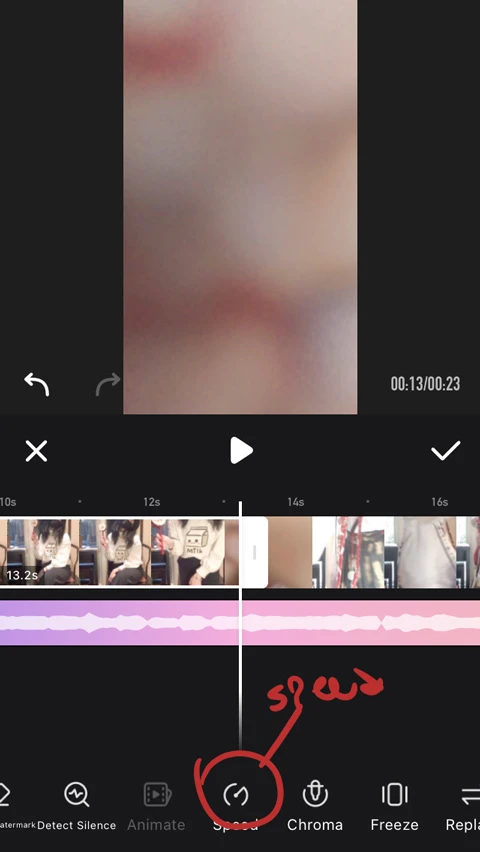
You can do this by not only trimming the lengths of the videos but also adjusting the speed. You can select the clip again, and then use the ‘speed’ tool in the toolbar to speed it up if the clip is too long or slow it down if the clip is too short, then trim/adjust the length from there.
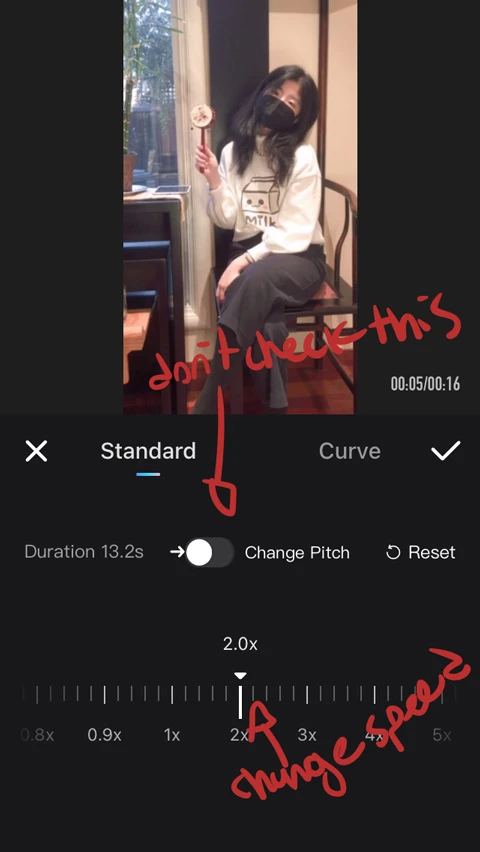
Adjusting the video speed
Then just time everything up correctly and you should be synced.
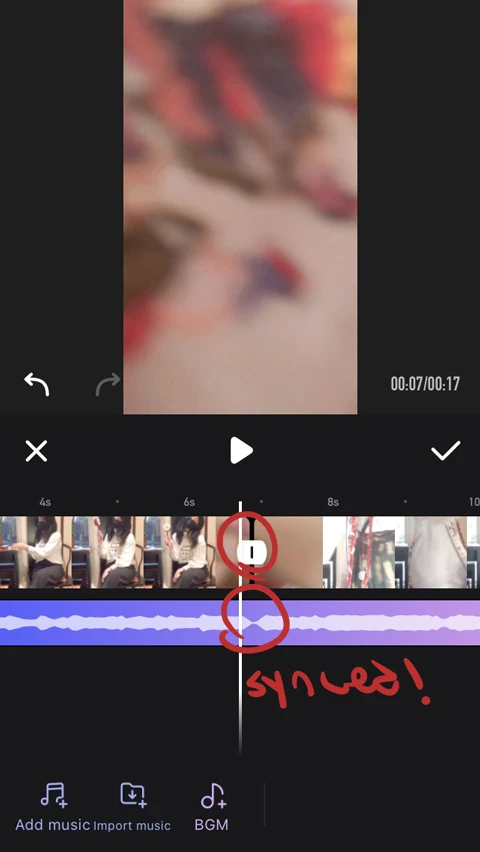
Keeping transition point of video and music in synced
Lastly you can finetune the video by using filters, effects, or frames. Play around with it until you’re satisfied, you can also click on the space between the two video clips to add a transition effect!
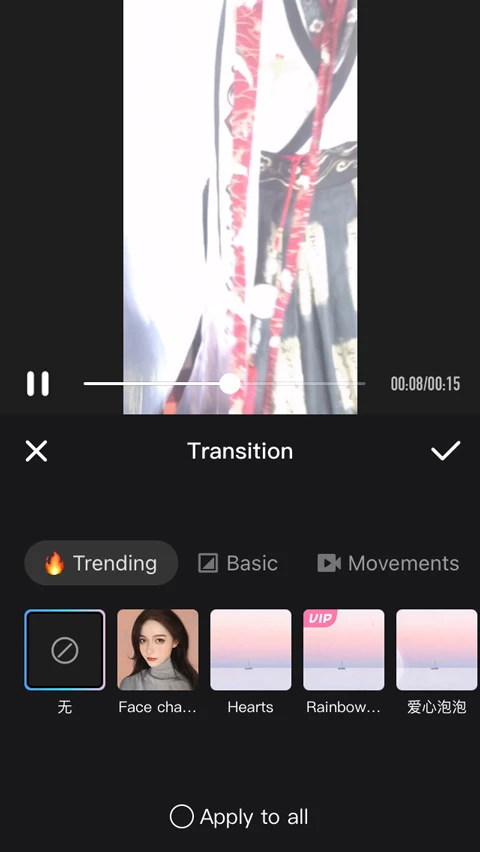
Finetune the video
After you’re done, just click save and you should be set.
Hope you enjoyed this tutorial, and please do post your creations on newhanfu if anyone wants to try it out!!




Harus dicoba
Terimakasih sudah berbagi
Absolutely perfect tutorial!
Nice share
😂😂I think finding the most appropriate rhythm is hard for me.
Don't worry about timing! You can always speed up or slow down your clips as you need to once you start editing, or just cut them to the right length ^^
A very detailed tutorial👍